Over the past few years I have watched as many of my scrapping and crafting friends have deftly announced their word of the year for the coming year. The word that will be their inspiration, their guide, their goal, their focus for the coming 12 months. I've never been so inspired or motivated to have my own "Word", until now.
This is kind of a new thing for me. I've no idea what to expect, what to plan, what form it will take, how I will record what this word means to me... nothing, just the word itself. I have faith that this is the right focus for me. I have faith that this is the right time for me to follow this creative journey. I have faith that things will all fall into place.
My word for 2012 is "Organisation".
Some who know me might question my choice... I know I have, several times. I'm an accountant, my day to day working life is all about organisation, I love systems, love methodologies, love organisation so surely this seems a bit defunct, a bit pointless, surely??
If I be honest with myself, and you... and in the past I have been (sometimes too honest)... despite my love of organisation at work, in my family life, my business, my scrapping, my home... it's all more like complete and utter chaos.
I'm not sure if it's a delayed reaction to what has been going on in the world around me the past 12 - 15 months or the impending threats of world annihilation (depending upon whether or not you agree), but being organised and prepared for whatever life is going to throw at me, seems really appropriate for the coming year.
Along with all my crafting bits and pieces, new products, tutorials and everything I throw at you, I will be sharing some of my organisational tips, tricks, trials and tribulations. That and whatever and however I end up recording all of it.
I've taken my first step already...
I've signed up to the 52 weeks to an organised home - weekly challenge through Home Storage Solutions 101. The schedule is up on their website for all to see, so you know what to expect when - I like this already. It also means that you can plan and alter as appropriate to suit your needs... for instance if you don't have kids or your kids are too old for you to clean their room, then you can always substitute these weeks for something else.
There is a link to the right (way down the bottom) of my blog so if you want to know more then by all means please go take a look.
There are going to be lots of other organisation and storage ideas over the next twelve months so be sure to check back for some inspiration.

Friday, December 30, 2011
Monday, December 26, 2011
Christmas Craft Challenge 2011 - Bonus
We've had a fantastic Christmas Day. Lots of presents, lots of lovely food... including my first ever turkey I've ever cooked with the most amazing Cranberry and Cashew Stuffing.
But I wanted to share the Christmas Cake my niece Kerry made for us.
 The Santa on top is a ceramic candle holder for a tea light candle.
 The Santas on the side are scrapbooking embellishments which were removed prior to eating.
 As you can see below, Kerry made the cake with two different layers. The top was a Vanilla Sponge while the bottom layers was traditional fruit cake. We could have a piece of either layer or both.
 I just love the look on my Granddaughter Sonia-Marie's face as she watches Kerry cut the cake.
But I wanted to share the Christmas Cake my niece Kerry made for us.


Saturday, December 24, 2011
Christmas Craft Challenge 2011 - Day 24
It's Christmas Eve at last and this is the final official blog post for the last day of the Christmas Craft Challenge for 2011.
We're having a bit of a sleepover here tonight. Our eldest, her partner and daughter are staying over so we get an early start on the present unwrapping in the morning.
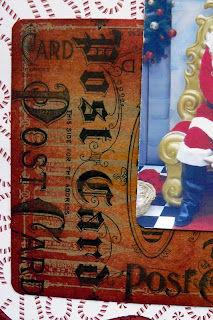
I kind of threw together a layout for today's challenge. I started it a few days ago and have spent a couple of days trying to copy this photograph without success... well that is to say I'm still not happy with the end result.
I'm also not that happy with the photographing of the layout... maybe I'm just a perfectionist - the red patterned paper has a foil finish that you just can't see well enough to keep me happy LOL.
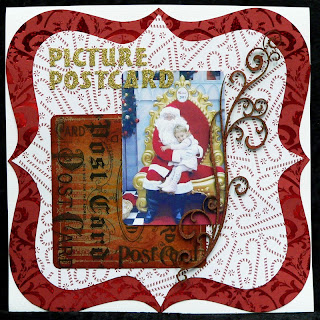

Materials used - Bazzill Cardstock - White; Patterned Paper - DCWV & Tim Holtz Craft Resist Pack - Christmas; Chipboard - The Dusty Attic; Glitter Letters - KB; Tim Holtz Distress Inks; Radiant Rain Paint Dauber; Tattered Angels - Glimmer Mist; Photo Splits
We're having a bit of a sleepover here tonight. Our eldest, her partner and daughter are staying over so we get an early start on the present unwrapping in the morning.
I kind of threw together a layout for today's challenge. I started it a few days ago and have spent a couple of days trying to copy this photograph without success... well that is to say I'm still not happy with the end result.
I'm also not that happy with the photographing of the layout... maybe I'm just a perfectionist - the red patterned paper has a foil finish that you just can't see well enough to keep me happy LOL.


Materials used - Bazzill Cardstock - White; Patterned Paper - DCWV & Tim Holtz Craft Resist Pack - Christmas; Chipboard - The Dusty Attic; Glitter Letters - KB; Tim Holtz Distress Inks; Radiant Rain Paint Dauber; Tattered Angels - Glimmer Mist; Photo Splits
Friday, December 23, 2011
Christmas Craft Challenge 2011 - Day 23
Today is also known as my first official day of Christmas Holidays. Ahhhh my bed felt so good this morning as we two enjoyed a few quiet moments together without the rude interruption of an alarm telling me to get up once, twice, three times. I could have stay with you even longer this morning has it not been for the noise of visitors and the pressure of a morning routine.
But now for the blog...
I've seen this idea in various guises in lots of places, especially Pinterest and I've always loved it and thought i was a really great idea and more importantly thought it would be lots of fun... and after all that's what life is all about.
I'm talking of course about Themed Photo Booths. I've seen them designed for weddings, engagement parties, birthdays and of course Christmas. Not only is there usually a setting but also Photo Booth Props and this is today's craft item.
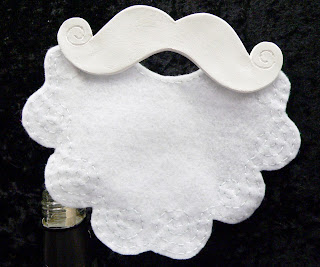
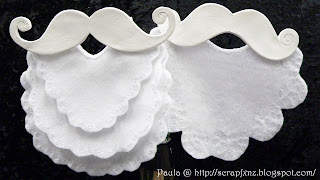
I've made some Santa beard props for our family photos. As everyone will be wearing their Santa hat, as per the request in the Christmas Day invite, I just know the perfect prop is of course a beard and mustache. I saw some links on Pinterest to various different ideas so I have created my own using what I had at home.


But now for the blog...
I've seen this idea in various guises in lots of places, especially Pinterest and I've always loved it and thought i was a really great idea and more importantly thought it would be lots of fun... and after all that's what life is all about.
I'm talking of course about Themed Photo Booths. I've seen them designed for weddings, engagement parties, birthdays and of course Christmas. Not only is there usually a setting but also Photo Booth Props and this is today's craft item.
I've made some Santa beard props for our family photos. As everyone will be wearing their Santa hat, as per the request in the Christmas Day invite, I just know the perfect prop is of course a beard and mustache. I saw some links on Pinterest to various different ideas so I have created my own using what I had at home.
- Firstly I sketched some mustaches, cut them out and measured them against my face for sizing. (Sorry no templates as I free-handed this)
- I figured I needed this to be a solid base to hold everything together so I used some Paper Clay to form the mustache. Mold it and shape it into a flattish sheet then trace around the patterns from the first step. I use an awl with a fine point to trace them, then cut around the pattern using a craft knife.
- Repeat for the second pattern (if you want a second mustache/beard set) then leave to dry overnight. The humidity was so bad here that on day three I put them into the roof access and they finally dried out overnight.
- Sand them down to remove the sharp edges from cutting them out and reshape them a little to look more natural. I used three grades of sandpaper... just from my scrapbooking distressing stash.
- Dust them well with a hard dry-brush then paint with a double layer of white gesso on both sides as well as the edge. For a more magical look paint a double layer of clear glitter paint on the front only. (Unfortunately this didn't show up very well in the photos - must be my poor lighting in here again.)
- Sketch a pattern for the beard making sure to trace the bottom edge of the mustache to get the fit right. Fold the paper in half before cutting to make sure both sides ended up looking the same.
- Pin the pattern onto white felt and cut out.
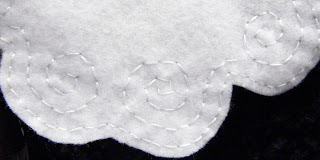
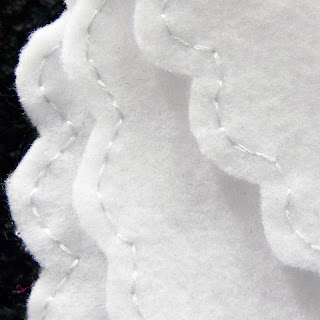
- As an optional extra decorate your beards with hand or machine stitching. Although it is a decorative extra, I did this also to stop (hopefully) the felt being stretch or torn during all the photos.
- Glue the beard to the bottom of the mustache. I used about 1/4" crossover and used Helmar Tiger Grip for the glue. It was dry in about 2 hours, though I made sure I did this a couple of days before the props are needed just to allow some curing time.
- Finish by attaching a wooden dowel or stick to use as the mask handle. I cut mine 30cm long and attached it with the Helmar Tiger Grip Glue, though you could also try a hit glue gun for both of these steps. Unfortunately you can't see the dowel very clearly as it's inside the bottle I'm using as my display tool.


Put the props inside your photo booth and let the fun begin. I will be posting some of the photo booth pictures both here and on Facebook, so be sure to check back after Christmas Day to see my nutty family and how much fun we all had with our Christmas Day Photo Booth.
Thursday, December 22, 2011
Christmas Craft Challenge 2011 - Day 22
Dear Santa and blog readers,
I've tried to be a good girl, honest...
I've tried really hard to hold off on blogging this Christmas Craft item, honest...
But you see I finished work today, so I feel the need for some kind of a celebration...
So I can't wait any longer, I just HAVE TO share this Christmas Craft!!
My Christmas Angel
When I bought my 3D Christmas Tree I also bought an Angel on sale. I've wanted a nice handmade angel for our Christmas Tree for a while now, but I've never been able to find one that I really loved so I figured if I didn't love one of my own creations, then I would have no one to blame but myself!!!
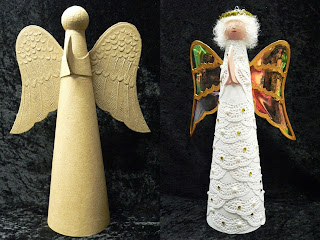
I found this strange beige little angel in desperate need of some tender loving care and a splash of colour. (Where is Gok when you need him??)
 See she was quite pretty, if a little plain.
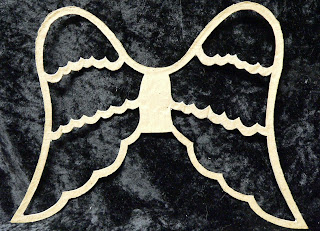
First thing I did was clip her wings. Well actually I did more than clip them, I removed them completely... though it was only temporary, she does get them back at the end of the make-over!!
 The wings sans body. In case you haven't guessed (cos I forgot to take a before photo), I then drew a pattern around the wings and cut out the bits I didn't want. I left a frame about 5/16 on an inch (6mm) around the outer edge as well as the bottom of each layer of feathers.
 The next step was to then paint the wing frames in a couple of coats of gold acrylic paint. I left the paint to dry overnight (yes instead of using the heat gun, for a change) between the layers of paint. I was concerned that using the heat gun too much might warp the frames hence my enforced patience.
 After the gold paint has dried. Now doesn't she look so much better already... and that's without a head or body!!
While the paint was drying on the wings, and so it didn't feel like I was sitting watching paint dry and doing nothing... I also painted the body of my fair maiden. I painted her head to toe in a couple of layers of white gesso... with a KaiserCraft foam brush of course. These truly are a Godsend to every crafter and you can pick them up very reasonably. I have three different sets in my eCommerce shop.
 Then I painted her head and hands with a skin-toned acrylic paint (but you probably guessed that).
I had seen the technique I ending up using to decorate her on a Christmas Tree and thought it looked beautiful, so I decided to "do it my way" and tried the same thing on my Angel.
I trimmed small paper doileys (from the $2 shop) in half. I adhered them in place around the body using a glue dot on either side of the doiley. I didn't worry about putting the glue dot on the die-cut part as I knew I would be layering the doiley halves on top of each other for complete coverage. It only got a little tricky around the arms... mainly it was just a matter of placement around the arms though as the body became significantly smaller near the head, I did have to trim the doiley halves a little and add some additional cuts to aid the shaping at this point. It was pretty much a feel it as you go type of thing.
 The next thing I did was add some hair. Now I need to point out that this was the FIRST time I have ever used doll's hair. I had intended to use long ringlet curls, much like my own hair (on a really, really, REALLY good hair day) but alas the dolls hair wouldn't do what I wanted it to do, so I after re-reading the instructions, I resorted to short, frizzy but still curly hair.
I think I prefer this, because as soon as it was done, I couldn't help thinking how much she looked like my late Nana - Lillian Mary Wilson (nee Walker). So from the time she received her hair, she also received her name. She is the Angel Lillian.
 And then of course I added a demure look on her face simply with acid free journaling pens.
 By now the wings had well and truly dried so it was time for their special treatment. If you've been following my blog during my Christmas Craft Challenge you would have seen my earlier blog about the Christmas Card swap I did and the non-traditional card with the removable bauble ornament. I used the same technique for my Angel's wings.
I cut some Angelina's Heat Bondable Film to the size of the wings.
Glued the film in place using Helmar Tiger Grip Glue and left this to dry overnight. This may have seemed like a long time, but I wanted to be sure.
I trimmed the film down to a 1 - 2mm overhang around the outside edge of the wings.
Using my trusty head tool, I heated the Angelina's film until it was taut across the frame of the wings.
I was not expecting the film to pull and re-shape the wings as much as what it did though I love the end result even more than I expected. The extra shaping just adds another design dimension that I love so much.
 I re-attached the wings to the body once again using the Helmar's Tiger Grip Glue and left her to dry. Then I added a halo which I made from a gold metallic pipe cleaner.
The final step was to add a little bling by dotting individual pearls and gold rhinestones on each of the roses in the die-cut part of the doileys forming the Angel's dress.
 And one final photo opportunity - in her pride of place on top of the Christmas Tree in Nana Lucy's lounge (my mother-in-law who lives with us).
 Since this photo was taken, the number of presents underneath the tree has increased significantly!!!! Unwrapping presents, may take all day!!
{Edited - Added Before & After Photo}
I've tried to be a good girl, honest...
I've tried really hard to hold off on blogging this Christmas Craft item, honest...
But you see I finished work today, so I feel the need for some kind of a celebration...
So I can't wait any longer, I just HAVE TO share this Christmas Craft!!
My Christmas Angel
When I bought my 3D Christmas Tree I also bought an Angel on sale. I've wanted a nice handmade angel for our Christmas Tree for a while now, but I've never been able to find one that I really loved so I figured if I didn't love one of my own creations, then I would have no one to blame but myself!!!
I found this strange beige little angel in desperate need of some tender loving care and a splash of colour. (Where is Gok when you need him??)

First thing I did was clip her wings. Well actually I did more than clip them, I removed them completely... though it was only temporary, she does get them back at the end of the make-over!!


While the paint was drying on the wings, and so it didn't feel like I was sitting watching paint dry and doing nothing... I also painted the body of my fair maiden. I painted her head to toe in a couple of layers of white gesso... with a KaiserCraft foam brush of course. These truly are a Godsend to every crafter and you can pick them up very reasonably. I have three different sets in my eCommerce shop.

I had seen the technique I ending up using to decorate her on a Christmas Tree and thought it looked beautiful, so I decided to "do it my way" and tried the same thing on my Angel.
I trimmed small paper doileys (from the $2 shop) in half. I adhered them in place around the body using a glue dot on either side of the doiley. I didn't worry about putting the glue dot on the die-cut part as I knew I would be layering the doiley halves on top of each other for complete coverage. It only got a little tricky around the arms... mainly it was just a matter of placement around the arms though as the body became significantly smaller near the head, I did have to trim the doiley halves a little and add some additional cuts to aid the shaping at this point. It was pretty much a feel it as you go type of thing.

I think I prefer this, because as soon as it was done, I couldn't help thinking how much she looked like my late Nana - Lillian Mary Wilson (nee Walker). So from the time she received her hair, she also received her name. She is the Angel Lillian.


I cut some Angelina's Heat Bondable Film to the size of the wings.
Glued the film in place using Helmar Tiger Grip Glue and left this to dry overnight. This may have seemed like a long time, but I wanted to be sure.
I trimmed the film down to a 1 - 2mm overhang around the outside edge of the wings.
Using my trusty head tool, I heated the Angelina's film until it was taut across the frame of the wings.
I was not expecting the film to pull and re-shape the wings as much as what it did though I love the end result even more than I expected. The extra shaping just adds another design dimension that I love so much.

The final step was to add a little bling by dotting individual pearls and gold rhinestones on each of the roses in the die-cut part of the doileys forming the Angel's dress.


{Edited - Added Before & After Photo}

Wednesday, December 21, 2011
Christmas Craft Challenge 2011 - Day 21
Warning - Today's Blog comes with a warning. Anyone with a delicate disposition should not proceed any further. Do not read this blog in front of children or anyone with a faint heart.
It contains not only stripping but partial nudity (of a sorts).
Turn around...
Go back now...
OK, don't say you weren't warned!!
Here it is at last... my 2011 handmade Christmas Card.
Final chance to turn around...
Enter at your peril...!
As you know our theme for Christmas day this year is Santa.
So far we've had:
 Right about now is where you should expect to hear "The Stripper" music playing in your head...
As Santa slips off his belt... just a little tease of what is to come! (Yes I am warped!)
 The Inside...

 Let the therapy begin!!! And no I don't mean RETAIL THERAPY... unless you want to head along and do some shopping here!!
It contains not only stripping but partial nudity (of a sorts).
Turn around...
Go back now...
OK, don't say you weren't warned!!
Here it is at last... my 2011 handmade Christmas Card.
Final chance to turn around...
Enter at your peril...!
As you know our theme for Christmas day this year is Santa.
So far we've had:
- Santa Invites
- Santa Gift Tags
- Santa Candles
Well now it is the Santa Christmas Card...
I must give credit to Melanie Evans who's original design I discovered in "Cards & Crafts for Christmas Magazine" - I think the first Christmas special publication.
The Outside... Yes that is the same belt, well not the EXACT SAME belt, but you know what I mean.

As Santa slips off his belt... just a little tease of what is to come! (Yes I am warped!)


Tuesday, December 20, 2011
Christmas Craft Challenge 2011 - Day 20
Great, simple and yummy craft today, thanks to my lovely friend Glenna who showed me these a few years ago... it's taken me until now to finally make them!!
Reindeer Candy Canes
 Sorry he started off a bit camera shy on his own... didn't want to look the camera straight on, kept blinking every time the camera went... bit of a diva really!!! Of course once he was joined by a few friends... and then a few more, he became a bit more cooperative!!


 Candy Cane (pre-wrapped in hygienic plastic).
Wrap the pipe cleaner around the hook then twist a couple of times to hold in place.
Wrap each end around a pencil then stretch out and up to give the reindeer horns.
Attach buggle/boggle/wobbly eyes. I used Tiger Grip Glue.
Leave to dry.
Optional extra - you can add a mini pompom for a nose. I didn't have any so they are all noseless.
Reindeer Candy Canes


Wrap the pipe cleaner around the hook then twist a couple of times to hold in place.
Wrap each end around a pencil then stretch out and up to give the reindeer horns.
Attach buggle/boggle/wobbly eyes. I used Tiger Grip Glue.
Leave to dry.
Optional extra - you can add a mini pompom for a nose. I didn't have any so they are all noseless.
Christmas Craft Challenge 2011 - Day 19
Yes another late one tonight... I admit it, I'm a tiger for punishment that's all there is to it.
After last Christmas I picked up some paper mache ornaments marked down after all the Christmas Sales. I picked them up already with thoughts of adding them to the 2011 Christmas Craft List. I didn't know what I would do with them exactly, but I knew I had a little under 12 months to think about it a bit.
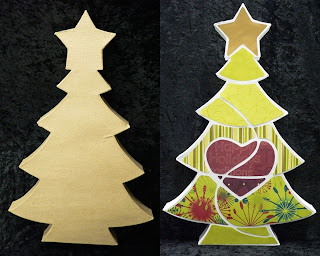
I loved this three dimensional tree as soon as I saw it (which was actually before the sale). I contemplated buying it several times, but thought it was a bit expensive... not so on sale.
Here it is in its naked state... raw... au natural. The tree is about two foot tall (guesstimate) and fitted on 2 A3 papers laid sideways.
 I painted the tree all over in white gesso, two coats. I knew I was going to cover it, so I wasn't too particular, just tried to get it even... thank goodness for large foam brushes!!!
 (This picture is intentionally on a slight angle to show you the depth of it.)
I cut a pattern by tracing around the outside with a pencil then decided on my design and hand sketched it. Once I was happy with the design I labelled the pattern pieces then cut them out. Then the fun started. I searched though all my scraps of red and green to find the right pieces to fit all the pattern pieces. From there it was simply a matter of tracing around the pattern pieces and cutting them out before finally adhering them onto the tree base.

 I really like the way it has turned out. I'm still contemplating what to do about the sides... for now they will just stay white. I'm also deciding whether or not to add any embellishments or just let the pattern speak for itself.
{Edited - Added Before and After Photographs}

After last Christmas I picked up some paper mache ornaments marked down after all the Christmas Sales. I picked them up already with thoughts of adding them to the 2011 Christmas Craft List. I didn't know what I would do with them exactly, but I knew I had a little under 12 months to think about it a bit.
I loved this three dimensional tree as soon as I saw it (which was actually before the sale). I contemplated buying it several times, but thought it was a bit expensive... not so on sale.
Here it is in its naked state... raw... au natural. The tree is about two foot tall (guesstimate) and fitted on 2 A3 papers laid sideways.


I cut a pattern by tracing around the outside with a pencil then decided on my design and hand sketched it. Once I was happy with the design I labelled the pattern pieces then cut them out. Then the fun started. I searched though all my scraps of red and green to find the right pieces to fit all the pattern pieces. From there it was simply a matter of tracing around the pattern pieces and cutting them out before finally adhering them onto the tree base.


{Edited - Added Before and After Photographs}


Sunday, December 18, 2011
Christmas Craft Challenge 2011 - Day 18
Well we are into the home stretch. It's a week until the Big Day itself - Christmas Day.
Am I ready... kind of.
ONE present to buy.
TWO parcels to post to the South Island.
THREE impatient kids to put up with for a week who are all trying to come up with every excuse under the sun for why the presents currently under the tree need to be rearranged, AGAIN!
FOUR days of work left.
FIVE more Christmas Craft Challenge items to finish (yes some already completed - thank goodness).
SIX(TY) odd Christmas cards still to be finished and written and then posted.
SEVEN sleeps until the big day which I know will just fly by far too fast and then it will all be over for another year and I can relax!!!
I'd never heard of gift card wallets until last Christmas when I was googling and found a tutorial on them. I made a couple last year for various presents and have become quite a convert!
This year I have made another couple. One is what I would call credit card size, the other is card size. I can't say too much as you never know who is watching, but suffice it to say the second gift card comes with a "To, from and how much" tear-off portion on the top, so its double the size of a credit card.
I've made the same style of gift card wallet for each but the sizes are different as are the method closing/fastening the wallet.
The smaller gift card wallet has a slip over band... in keeping with this year's theme. If you think it looks familiar you probably saw it here and just a hint... you will see it once more.

 And that is an OLD gift card not the real one for anyone playing guess the gift card at home!!
As the larger gift card wallet couldn't be sealed at the sides (it would have been too wide for the envelope) I used the belt to hold everything in place by adhering it in position. The top flat folds inside the pocket to seal it closed.

 Believe it or not, both belts and buckles are exactly the same size on both gift card wallets.
Am I ready... kind of.
ONE present to buy.
TWO parcels to post to the South Island.
THREE impatient kids to put up with for a week who are all trying to come up with every excuse under the sun for why the presents currently under the tree need to be rearranged, AGAIN!
FOUR days of work left.
FIVE more Christmas Craft Challenge items to finish (yes some already completed - thank goodness).
SIX(TY) odd Christmas cards still to be finished and written and then posted.
SEVEN sleeps until the big day which I know will just fly by far too fast and then it will all be over for another year and I can relax!!!
I'd never heard of gift card wallets until last Christmas when I was googling and found a tutorial on them. I made a couple last year for various presents and have become quite a convert!
This year I have made another couple. One is what I would call credit card size, the other is card size. I can't say too much as you never know who is watching, but suffice it to say the second gift card comes with a "To, from and how much" tear-off portion on the top, so its double the size of a credit card.
I've made the same style of gift card wallet for each but the sizes are different as are the method closing/fastening the wallet.
The smaller gift card wallet has a slip over band... in keeping with this year's theme. If you think it looks familiar you probably saw it here and just a hint... you will see it once more.


As the larger gift card wallet couldn't be sealed at the sides (it would have been too wide for the envelope) I used the belt to hold everything in place by adhering it in position. The top flat folds inside the pocket to seal it closed.


Christmas Craft Challenge 2011 - Day 17
Ok I know I am late, as technically its now the 18th here, but I have a good excuse. Today (the 17th) was my darling hubbie's birthday, so I've been in birthday mode all day instead of Christmas Craft Challenge mode. Although we didn't do anything special, no big party - thank goodness as it has rained all day - we've still had family over most of the day as well as phone calls to and from my parents and sister.
As long as I can remember we've always had a candle(s) on the table on Christmas Day. I can't remember why or when this tradition started but I have vague recollections of it being my fault after I insisted on my mother buying a HUGE Santa Claus shaped candle because I thought it was just the bee's knees. It was the first "shaped" candle I had ever seen... so given this fact, I was probably around 8 - 10 at the time... so a few years ago. He was a good'un that Santa Candle as I know we lit him every year for at least three or four years and apart from loosing his hat to the power of the flame, he served as well.
Anyway... so in keeping with tradition I've made some candles for Christmas Day. We've got 22 - 24 for Christmas Day so it's probably going to be three or four tables end to end in the big garage. (Our small garage is my Craft Studio aka the Dungeon.)
I've made two candles to keep with our Santa theme. One is a really simple decoration... the other is even more simpler. And then two more to complement - these were the problem children tonight and why I'm late posting. More on that later in the post.
Santa Candles:

Simple Version
- Start with a white church candle, whatever diameter & height you like. I would have liked mine to be slightly taller, but I couldn't get a matching pair the same diameter & height, so got the closest I could without spending a small fortune.
- Measure the height of the candle & the diameter, then cut a piece of red cardstock that exact height but 3/4" - 1" longer than the diameter of the candle (so you have plenty of wrap around the candle).
- Adhere some strong double sided adhesive along one of the short ends. I used Wondertape as it seems to have a much stronger hold than ordinary double sided adhesive. As I've found out in the past you do need an extra bit of grip when trying to keep cardstock to stay in place around a curved object.
- Roll the cardstock around the candle and adhere closed.
- Cut a strip of black paper 1" wide and the same length that you cut your red cardstock. Remember it needs to go around the entire diameter of the candle with a bit spare to adhere one end securely over the other end. I used Teresa Collins "Timeless Black Flocked Paper" which has this amazing velvet feel. It is so perfect for Santa's belt not only because of the feel but also the colour... it is sure a pure looking black.
- Cut a 1 1/2" square from silver mirror paper. I used Teresa Collins "On the Edge Reflective Paper". It lives up to its name to be sure. It's so reflective you can see your image in it when you look at the page. I then ran the square through my Cuttlebug and cut a 1" square in the middle to create a buckle. It did take a bit of eyeballing to line up the die but as you will see in a later post I had a few to do, so I soon became a dab hand at it. You can always measure and draw lines, then cut the centre out with a craft knife if you don't have a die cutter or the right sized die.
- Adhere the buckle onto Santa's belt.
Simpler Version
- Buy a red candle then follow the above from the belt on. It still looks just as effective as the Simple Version - only Santa has a red hat instead of a white head.
Candy Cane Candles:

- Start with straight sided white candles. These are 5cm diameter & 15cm tall.
- Cut acetate to size - same height as candle, length slightly longer than the diameter of the candle. (I did try sticking the adhesive directly onto the candle but neither double sided tape of even Wondertape would stick - grrrr, oh well, we live and learn)
- Adhere double sided tape of various widths on a diagonal across the width of the acetate. I did all the full length stripes first as it was easier to use the lines on my cutting mat to make sure I was laying the double sided adhesive and Wondertape on straight.
- Adhere a strip of Wondertape along one of the side edges then roll the acetate around the candle and adhere in place. (This was about where I found out that neither candle was actually straight... but no one will ever know the truth!!!)
- Finishing adhering stripes that cover the seam in the acetate.
- Remove the backing paper from the adhesive stripes and cover with glitter. Be sure to do this task over drip paper or a glitter tray to catch the excess so you can reuse it. I used glitter trays so was able to roll the candles around in the glitter to help it adhere.
- NOTE: This is the messy bit of the craft. Be warned - no matter how much you try to wrangle your glitter to keep it in place, its still going to end up everywhere!!!
- Once you are happy with the coverage of the glitter, use a firm brush to remove any excess glitter. (If you thought the above was messy... this step is even worse!!)
- Return the excess glitter to the bottle. I have found a mini funnel is perfect for this task even when using a glitter tray to catch the excess.
Here are all the finished candles. I think they all look great.

Friday, December 16, 2011
Christmas Craft Challenge 2011 - Day 16
Following from yesterday's craft... here is a more complicated version.
As the insides of the tubes were already white, I only painted the outside of the tube (bonus) though I did do four layers of paint - two white and then two clear with crystal glitter.
Once I had stuck the loops altogether... following the instructions from yesterday, I then added some bead combinations for something more spectacular.


Thursday, December 15, 2011
Christmas Craft Challenge 2011 - Day 15
I'm a great proponent of recycling, reusing and re-purposing especially in my crafting. (I'm not so hot with sorting my recycling for the rubbish collection, but nobody's perfect).
I don't know about anyone else but in our house we seem to go through toilet paper like its going out of fashion which means of course that we end up with what can seem like thousands of toilet roll tubes.
I've made toilet roll albums in the past... these still need some work for me to be happy with the end result but then I know I am a perfectionist.
During one of my many, many, MANY trolling the internet sessions on Pinterest I saw these really cool ornaments. Not only do they use up the toilet roll inner tube, but these are a great craft for kids to try.
- Find some toilet roll inner tubes without any toilet paper dregs stuck on them. It just looks tidier on the end result.
- Squish the tube flat - I used my fingers for the first bit of squishing, then finished off with a bone folder to clean up the fold. For kids you can just use finger pressure.
- Measure along the tube to get six even slices of tubes. I made my slices 15mm wide and ended up with about 10mm left over... bin this bit.
- Cut along each line to give you six rings. Re-shape these slightly to give you an oval shaped ring.
- You can then colour the rings inside and out if you want to. I painted mine both inside and out. If you are doing this craft with kids you could try fingers painting or crayons instead... just make sure you have plenty of protective paper down. Using acrylic paint, the first was well dry by the time I finished the last one.
- Now the fun of putting them altogether. The trick to making this step easier... paperclips!!! Use the paperclips to hold two rings together, joining all the rings into a six-pointed star. Using the paperclips you can keep rearranging the loops until you get the loops linked the way you want.
- Once you are happy with where the joins will be... remove one paperclip noting where the tape needs to be. Then adhere double sided tape in exactly the spot where the paperclip held the two loops together. I used Wondertape. It is incredibly tacky and will hold anything together. I found it was perfect and I didn't have to wait for the glue to dry... always a bonus as we all know how impatient I am!!!
- Repeat step 7 to join all six loops together.
- Finally add a small hole using your trusty Crop-O-Dile into what will be your top loop. Thread through some string to use to hang your ornament with. I did find I needed to add beads to stop the threads passing through the hole in the top of the loop. For a kids version, you could just tie the string around the top loop rather than worrying about a hole.

Subscribe to:
Posts (Atom)