Burnt and Folded Flowers
September is the month for Halloween swaps on Scrappers Obsessionz Forum in preparation for the real thing the following month. For a change I'm starting early so I don't have my usual end of the month panic.
I'm doing a number of swaps so am mixing things up a bit, but here is the first of two flowers that I am creating for one of the swaps. They are a combination of a couple of things I seen around the blogs and tutorials together with a touch of my own.
You may have seen flowers created with a burnt edge. I created some red flowers for last month's swap which you can see here, though I didn't show you a tutorial. These red flowers had a hand-scalloped edge which I burnt to create the fluted look of petals. This time around I just used full circles and burnt the edges of these, before combining in a flower making technique using folding to create the petals. This burnt edge gives the flowers a unique look and combined with my own "different" folding technique (just to be different), I really love the way the flowers have turned out.
The step by step is shown for some red and black flowers I created using a 2" circle, where as the green and black "Halloween" versions I made for the swap were created using a 4" circle.
1 - Start by cutting strips of your chosen fabric slightly wider than your circle size. As my circles are going to be 2" in diameter, I cut my strips of organza fabric 2 1/4" in width. I've chosen to make two-colour flowers, but you could make single colour or four-colour flowers if you preferred.
2 - Cut your strips into squares. I found it easier to cut from squares rather than the strips - just more manageable. I didn't measure any of this just eye-balled things using my circle templates. I made plastic circle templates from $2 shop place mats using my Fiskars Circle Template. Each flower has two layers of four petals so for a two colour flower you need 4 squares of each colour.
3 - Hold your circle template on top of each fabric square and use this as a guide to cut out each circle. This meant I didn't have to trace each circle. You don't need to cut out each circle perfectly as the edge is going to be burnt so you will soon hide any small imperfections. (The picture below is half cut out).
This picture shows the progression - square of fabric plus template then cut out circle. Followed by a big pile of cut out circles. From two single strips of fabric I was able to make two flowers. I used 18" wide florists organza which I picked up cheap at an emporium shop for $3.00 per metre. From one metre of a single colour you could probably make four, maybe five two layered 4" flowers or at least 10 - 12 of the 2" flowers.
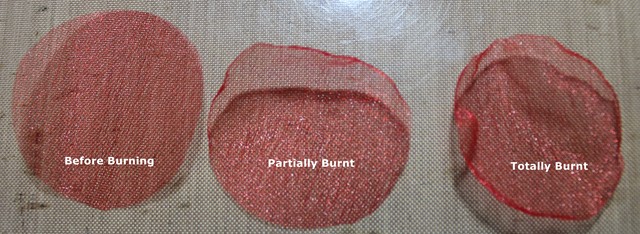
4 - Now for the fun bit - burning the edge of the circle using a tea light candle. A word of warning - the fabric will burn VERY QUICKLY using the open flame so you need to be very careful. Less is more. Start further away from the candle than you think and gradually moving closer. You will soon find out the optimal distance from the candle to achieve the burnt edge look. One final word of warning - be sure to keep your fingers well away from the flame as well as the melting fabric - both are VERY HOT!!
You can always re-burn the edge if you feel it needs more of an edge but you can't un-burn a hole!!
Here is a progress shot. Circle before, part way through and after the burning process. You can see quite a noticeable difference to the burnt edge. The fibres melt into each other so that the fabric doesn't fray. The principle is the same as sealing the end of a nylon rope using a match. (Gong back to my old Girl Guides days there!!)
I found I would burn an entire circle in about five or six twists above the flame. I got into a rhythm of swirling a circle over the flame, moving my fingers, swirl the next section, move fingers etc until the entire circle was done. Once I got my rhythm sorted, I could burn an entire circle in about ten seconds - very quick process.
And now a big pile of circles with burnt edges. The circles will all end up different shapes and sizes as there is no way to control exactly how each edge will react to the process.
5 - Now for the folding and putting together part of the process. Fold each circle in half. This is also where you consider how to hide any accidental over burns so no one notices them. (People will never know!!)
6 - This is where my folding differs from all other tutorials I've seen. Most fold the semi circle into quarters. For my flowers I folded the semi-circles into 1/8ths folding in each side to make a quarter flower. (If that doesn't make sense, then hopefully the pictures show what I mean.) Fold in one side...
Then fold in the other side, so you have a "seam line" in the middle which is the two folded edges.
7 - Adhere the quarter circle, point in and folded seam line facing down. For my base I cut out 1" circles from recycled cardboard (tissue boxes) which I covered in glue dots. For the larger green and black flowers I didn't use the cardboard just a circle of double sided adhesive.
8 - Repeat steps 5 - 7 with second circle. As my flowers are going to be red and black I alternated the colours of the petals.
9 - Complete the flower layer with two more petals.
10 - Each flower has two layers so repeat step 5 - 9 again for the second layer.
11 - Finish the flower by stacking one layer on top of the other offsetting them by 1/8th of a turn and hold together using a coordinating brad. The offset disguises the fact the petals may not align completely and it makes them look so much cooler.
For the green and black flowers, I didn't have brads big enough for the look I wanted to I cut out circles of recycled cardstock and adhered double sided adhesive to each side. On one side I adhered black glitter, then I peeled the second side off the back and adhered this directly onto the top of the flower.
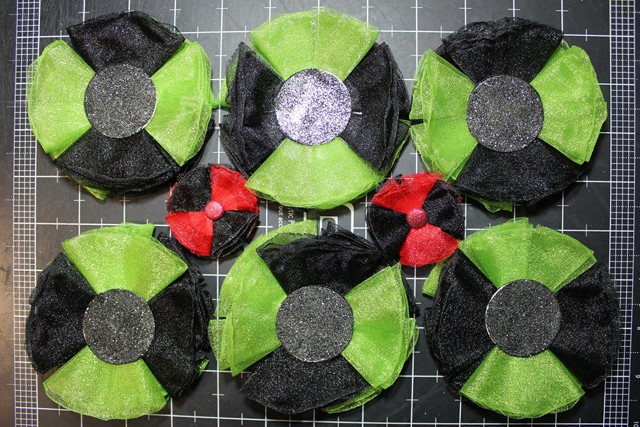
Below are the finished flowers. The green and black used a 4" diameter circle and the red and black used a 2" diameter circle. I really love the baudy, garish "Halloween" colours of all these flowers. I hope the other girls in the swap love them as much as I do.


No comments:
Post a Comment