Sunday, October 28, 2012

Blog Candy for Me

Earlier this year I entered a contest that I had spotted on Facebook for a blog giveaway from Gel-a-tins. I didn't think any more about it until a while later I received a message from Bonnie the owner of Gel-a-tins letting me know I was the lucky winner of the contest and so she needed my postal address to send me my spoils.

Needless to say I was somewhat stunned and overjoyed at my luck... and then somewhat impatient to see what goodies were headed my way.
Bonnie and I messaged for a wee bit as the parcel was returned to her, instead of being delivered to me. The New Zealand Customs Service in their wisdom had not allowed the parcel into the country... no idea why not. So Bonnie once again dutifully sent my bag of goodies of to me.

A few weeks later and a nondescript Kraft bubble padded envelope turned up in my letter box. As I opened the parcel I racked my brain to think what might be included inside. I hadn't ordered anything, I wasn't expecting anything, so what could it be. A quick read of the sender's address and I knew exactly what it was... my prize from Bonnie at Gel-a-tins.


With bated breath I slowly opened the parcel... 
Then gradually pried apart the sealed edge...
And looked inside...
WOW...
Lots of goodies for me. (Sorry before I go any further I am stating categorically I'm not sharing these with anyone... they are all mine!!!)
It was like a late birthday present/early Christmas present.
I took the bits and pieces out one at a time... prolonging the anticipation (and yes feeling a lot like a kid at Christmas!!)
Bonnie had definitely spoilt me.


So without further ado (because I know you are keen to see as well) here are the totally wonderful goodies I received from Bonnie at Gel-a-tins.
 Look at all these goodies...
 Gelly Gem Roll Ups - Silver
Sheet of Gelly Gems - like a flexible fabric 4.5" x 12" made up entirely of gems. Can be adhered onto paper craft projects or sewn onto fabrics and clothing.
 Gelly acrylic stamping block - colour Lemon Splash; size 2.5" x 2.5"
Transparent stamping block but in a really cool colour.
 Gelly Jr - Mini clear rubber stamp - Snowflake.
About 2" x 2"
 Gel-a-tins clear rubber stamp set in small metal storage tin 2.5" x 3.5"
Theme - Love and Kisses, includes 20 individual clear stamps.
The really cool tin that the Gel-a-tins clear stamps are stored in.

I would like to thank Bonnie and Gel-a-tins for the amazing parcel of goodies. I really do appreciate these the effort and kindness in sharing these with me.
To see more of the Gel-a-tins range and to let me know which ones you really like so I can order them in (hint hint), you can check out their range of clear stamps, acrylic stamping blocks, Gelly Gems and embossing powders on their website at http://gelatinstamps.com/ or to follow Gel-a-tins on Facebook you can find them here.
Saturday, October 27, 2012

Water Colours - Using my Collection - A Review

I've always liked water colours when they don't look pale and overly washed out. (I can see some of you rolling your eyes saying yes we know you like bright colours!!)
Even as a teenager I loved them. I started collecting water colour pencils one at a time because the ones I wanted were so expensive. I used them for various creations and school projects and then I stored them carefully away in a plastic bag for a decade or two (but who's counting).
I've watched various tutorials on You Tube and television about how you can use water colour in your scrapping and paper crafting and I just knew I had to give it a go again. 
In my usual OCD way I also invested in some more water colour products because one can never have enough options (or so I keep telling myself).
So I ended up with water colour pencils, crayons, paints and paper. 
And finally (because laptop wasn't working and I had no excuse NOT to) I did some experimenting with my stash.
Being an analytical OCD type personality, I had to do it right and experiment with different papers as well as the different water colour products so I could see what worked best with what.
I had a selection of different papers - sketch, drawing, water colour and from an art journaling book. As I had four colour mediums, I cut each piece of paper in quarters.
I coloured a small sample of each colour of each product onto each piece of paper, then used my zig water brush to diffuse the colour. I then left each piece of paper to dry naturally.
I bought this pencil set though the book delivery people who leave books in your office for people to buy. The set comes with coloured pencils, drawings pencils, water colour pencils, charcoal pencils and metallic pencils.
Result using the water colour pencils from the pencil set.
L - R journal book paper, sketch paper, drawing paper, water colour paper (lightest weight to heaviest weight paper) 
I was a little disappointed in how wishy-washy the end result was but then they were relatively cheap. Conclusion: buy the best quality you can afford, the results are worth it.
Water colour paint set

Result using the water colour paints.
L - R journal book paper, sketch paper, drawing paper, water colour paper (lightest weight to heaviest weight paper)
I was really impressed with the intensity of the colours of the paints. I thought they might be the most washed out of all, but they weren't. The paint set was NZD$14.00 from Warehouse Stationery which I thought was very reasonable. If you are just wanting to do a little experimenting then this would be a good, value for money investment. 

 
Water colour crayons

Result using the water colour pencils from the crayon set.
L - R journal book paper, sketch paper, drawing paper, water colour paper (lightest weight to heaviest weight paper)
I have had these a while. I bought them and then never touched them. To be honest I really wasn't sure if they would work or not, I mean crayons usually repel water, don't they??
They really do work and they work really well. This pack contains 36 different colours of crayons. There is a nice range of colours which will allow for a good selection of toning of colours.
I tried these both direct to paper and from the crayon and both methods worked well. If you had a larger background area you were colouring then I would suggest the direct to paper method, where you colour the area with the crayon directly onto the paper. If you were only colouring small areas, then colouring from the crayon would be much easier to control as you are taking the colour from the crayon to the paper.
These were considerably more expensive than the paints - costing about NZ $55 - 60 (from memory). If you are interested in these please let me know as I am able to buy these from my supplier and will certainly be sure to offer a very reasonable price to my blog readers.

Coloured pencils by Caran d'ache of Switzerland.
I bought these pencils 20+ years ago and back then each pencil cost from memory NZ $7 - $10. I have googled them and the can be bought from overseas in packs of up to 80 pencils. I'm not sure if you can still get them here in New Zealand - maybe if you search specialist art equipment shops.
I did see one price listed as up to USD $350.00 for a set, so this is definitely an investment that should not be taken lightly.

Result using the water colour pencils from the individual pencils.
L - R journal book paper, sketch paper, drawing paper, water colour paper (lightest weight to heaviest weight paper) 
The colour selection is amazing and I don't have every colour. I found these to be the most versatile medium and having looked at the brochure for them, there is still a number of techniques that I have yet to try. 
For more information including a link to the brochure of techniques look at the Caran d'ache website.


Once I had finished my colour swatches (for lack of a better name), I stamped a few images and coloured them in to get an idea for finished projects. I cut the water colour paper a size that would fit onto a normal card blank so I could use them at a later date.
Image stamped with Ranger Archival Ink - Jet Black. These were from a set of stamps that I received free with a card making magazine.
This was coloured using my water colour pencils. I was able to get some quite subtle shading and blending of colour, though being a perfectionist, I think this still needs a great deal of work yet. I was able to achieve a range of intensity from very pale to quite strong which was good to see (as I appreciate that not everyone agrees with me about intensity of colour).
Stamp from KaiserCraft.
I coloured this image using the water colour paints. The photo looks a little darker than the finished product looks in reality though I have to confess that the colour is perhaps a little too intense given that each petal has a word in it and these are a little hard to see.
This was another craft magazine freebie. As cute as I think it is, it was really difficult to colour as the image is so small (only about 2" tall) so the small areas like the Christmas baubles and lights were harder to colour than I expected. Maybe with a little practice I might feel differently.

This was coloured with the water colour crayons using the colour from the crayon to the paper. Love the colours, even if my colour selection itself is a bit suspect (I was experimenting okay!!). I do like the blending I was able to get especially in the heart in the background. And the stamp was another freebie.

My final experiment was to test if I had any black pens that were water proof as an alternative to stamping an image with waterproof ink. I got this idea from watching an episode of Scrapbook Soup on satellite television. One of the two show hosts, Julie Fei-Fan Balzer, is a huge proponent of water colouring and is one of the reasons I finally got my act together to try my water colours. You can see Julie's creations on her blog at Balzer Designs.  
I wasn't sure if I had pens I could use that wouldn't bleed when the water colour was added. I tried a number of pens and found that both the Slick Writer by American Crafts and the Zig Writer by Zig Memory System did not bleed when spritzed with water or coloured with water colour paint.

Friday, October 26, 2012

Recycled Rubbish - Desk Organiser

I'd forgotten about the down side of buying a new laptop... not the reloading of all the software, I knew that was going to take a bit of time, but the updating of all the software especially the operating system. 
The downloading bit quite happily happens in the background, you don't even notice it most of the time. It's when you go to shutdown and it tells you that the laptop needs to install all the updates that the boring bit REALLY begins!! 
In case you didn't know... your laptop, or computer, will not complete the shutdown process until it has installed all the updates. All very well in theory until you realise that the mere 70 odd updates it needs to install are actually going to take OVER NIGHT to complete. And during this installation process, you can't do anything with your laptop... at all, other than keep checking to see if it's done!
And if you are really unlucky, then the same thing happens the following night as well... I must have been really unlucky to have this happen two nights in a row. 
The good news... is that not having access to my new laptop, meant I didn't spend all night on it updating and downloading software or playing games on Facebook or googling tutorials or Pinterest.
Instead... I got to spend two fun-filled nights cleaning up the studio. Slow progress I will admit and I still have a long way to go, though I did make considerable progress and I was happy with what I achieved.
When the aforementioned cleaning got a bit boring (as it does), I did squeeze in some crafting to complement the cleaning process.
I'm not a coffee drinker... and my apologies to all of you who are, but I hate the stuff. I don't like the taste or the smell and have been told (to my face) that I actually make a horrible coffee. Of course it may have been that I was making sure I didn't get asked to make any ever again, but you never heard that from me.
I drink, when I'm cold, hot chocolate, chai lattes or soup.
Which means I have managed to accumulate quite a collection of used hot chocolate containers as well as various other containers... like Pringles tins.
I've seen some really cool samples where crafters have recycled tins into desk organisers, so I figured why couldn't I use my stash of chocolate and Pringles tins... same thing really.
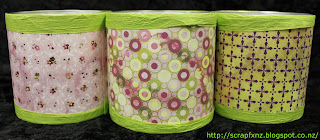
I decided upon a collection of three chocolate tins and two small Pringles tins as I figured these would all be a great size for pens, scissors, tools etc on my scrap desk instead of them lying in a pile as they were at the time.
I selected patterned paper from the Basic Grey Eva Collection which I had in my stash. I covered each tin in a different patterned paper.
I then adhered a coloured raffia ribbon around the top and bottom of each tin to hide the silver edges and give the collection of tins a unifying element.
Finally I adhered the tins to each other in the position I wanted them, using double sided foam adhesive. This filled in the slight gaps between the tins. (Each tin had a slight lip top and bottom so there was a thin gap between the sides of the various tins even though the top and bottom were touching.)
Then I filled them up with all the stuff from my desk. I was surprised at how much "stuff" I was able to fit in the tins.
I grouped like things together - for instance all my scissors in one tin with some other bulky tools, pens in another tin, my most frequently used liquid adhesives in another tin.
And then the extra things I added were a selection of small bulldog clips onto some of the tins. I frequently end up with notes on small pieces of paper, layout ideas and I need one place to put them all until I decide what to do with them.
Here are pictures to show you the finished desk organiser: 
Organiser from the front
Organiser from the back
Organiser looking down on angle
Organiser looking straight down
All filled up with my tools and bits and pieces - front
All filled up from the back
Doesn't that look smart and so much neater and tidier and it's much easier for me to find what I'm looking for.


Wednesday, October 24, 2012

Good News... aka the continuing laptop saga

Not sure if you are following along at home with the continuing saga of my now dead laptop or not but here is the next installment...

In a nut shell...
My old laptop was diagnosed with a dying video chip which meant I could still use it thought I had to tolerate a screen covered in coloured stripes. That worked in theory until last weekend (a holiday long weekend for us here in New Zealand) when the video chip gave up completely and all I got when I turned my laptop on was a pretty (but nonfunctional) red screen.
Luckily being a long weekend (Labour Weekend) lots of stores had sales on...
Unluckily everyone else thought this was also a good idea...
Luckily when I went to my local Warehouse Stationery shop they still had a pretty good selection of laptops for sale...
Unluckily the one I wanted there was only the display model...
Luckily I still wanted it and the price was too good to miss out so I bought the display model as someone else was also looking at that very laptop...
Unluckily the store clerk said he would have to reset it to factory default...
Luckily I wasn't in that much of a rush so I could come back in an hour to pick up my new laptop as they were so close to my home...

So I picked her up and took her home with intentions of loading up all my software over the remainder of the long weekend so I could be back fully functional early in the week...

Unluckily when they had reset everything, something went array and I couldn't access the internet or any of the other software that the laptop supposedly had on it...
Luckily I had a system disc so I reloaded the operating system...
Unluckily that didn't work...
Luckily I wasn't working the next day so I was able to take my new laptop back to the store and explain what was wrong...
Unluckily they wanted to run some tests and try to solve the problem themselves so I had to go home again empty handed...
Luckily or unluckily depending upon your point of view they couldn't solve the problems so I got a phone call at midday to tell me they were couriering a replacement laptop from another store...
Luckily it arrived and about two hours later I picked up my new new laptop...
Luckily it was untouched, still sealed from the factory...
Luckily everything worked 100% when I plugged it all back in...
Luckily I kept an up-to-date list of software that I used on a regular basis that I needed to download...
Luckily I haven't looked back since I brought it home...

My new baby is nearly up to date. Still a few more programmes to download so I will be fully functional. Then I just need to upload my data from my backups and I will be back up and running at 100% as if nothing had happened.

Phew... it's been a busy couple of days, even though you spend a fair amount of time sitting around staring at the screen while software uploads... but I feel good and positive about moving forward. 

The really good news is that in a day or two I hope to be able to carry on with my blogging as if nothing had ever happened. YAY for blog posts with pictures and maybe video... instead of just me yabbering on.

Watch this space...

Sunday, October 21, 2012

Blog Candy Winner and an Apology

Last week I posted blog posting number 250 and promised some blog candy for one lucky blog follower. Congratulations to Carrie Kemp. I will have a parcel of goodies out to you soon.

And now for an apology. Alas there may be a few gaps between posts for a wee bit. My laptop has finally given up the ghost and I've been forced to borrow my hubbies (when he will let me lol). I knew she was on the way out... my IT tech man had told me this, though I was kind of hoping she would last until the new year. Alas it wasn't meant to be.

So until I can afford to replace my dear, departed laptop, I'm not sure how often I will be able to post. I will try my best as I really do enjoy sharing my creations with my friends.

All the best, Paula.

P.S. The Christmas Craft Challenge will still go ahead this year, one way or another... she says hopefully!!!

Thursday, October 18, 2012

Halloween Swap - Charm

The specs for the swap said we were to create a hanging charm that would be suited to hanging from a mini album or the like with a Halloween theme... sounded simple enough... but then I made my Halloween Flowers and my Halloween Pins and my Halloween Tags and then I hit a brick wall as I struggled to think of something new and not a repetition of something I had already created. 
Much thinking later... and some experimenting and one or two epic failures... and this is what I came up with.
The completed charms for the swap. I decided to make a "Compact Compound Collection" aka a portable witches brew kit - things I think the witch on the fly would be likely to use on the go.
 The brew kit comes with an instruction manual detailing what is included in the kit. It hangs from a handy Swivel Clasp from Tim Holtz, designed to hang from the keys to your witch's broom.
The front cover and inside pages of the instruction kit.
Eye of newt - hand stitched felt eye ball, with button iris.
 Back of the eye ball showing the hand stitches veins. (I loved the way these ended up looking!!)
 Moonbeams - seashell crescent drop.
Shrunken Pumpkin - fuzzy ball with stitching to create the creases of the pumpkin skin.
Drop and a half of bat blood - stacked beads 
Evil Goblin Tear Drop - stacked seed beads with a tear drop bead.
Vial of Fairy Dust - recycled mini bottle filled with mixed glitter. Chain wrapped around neck of bottle and a vial label (so you know what is inside).

Don't forget to check out post number 250 to be in to win the blog candy.

Wednesday, October 17, 2012

New Products

If you haven't checked on my website recently then you are missing some new products. I've just added a number of new die-cut chipboard and MDF items from The Dusty Attic that I know you will love as much as I do.

If you are interested in any of these new products, just click on the name of the product and that will take you straight to it on the website. Be sure to look around at the other great products listed while you are browsing.